 Skip to content
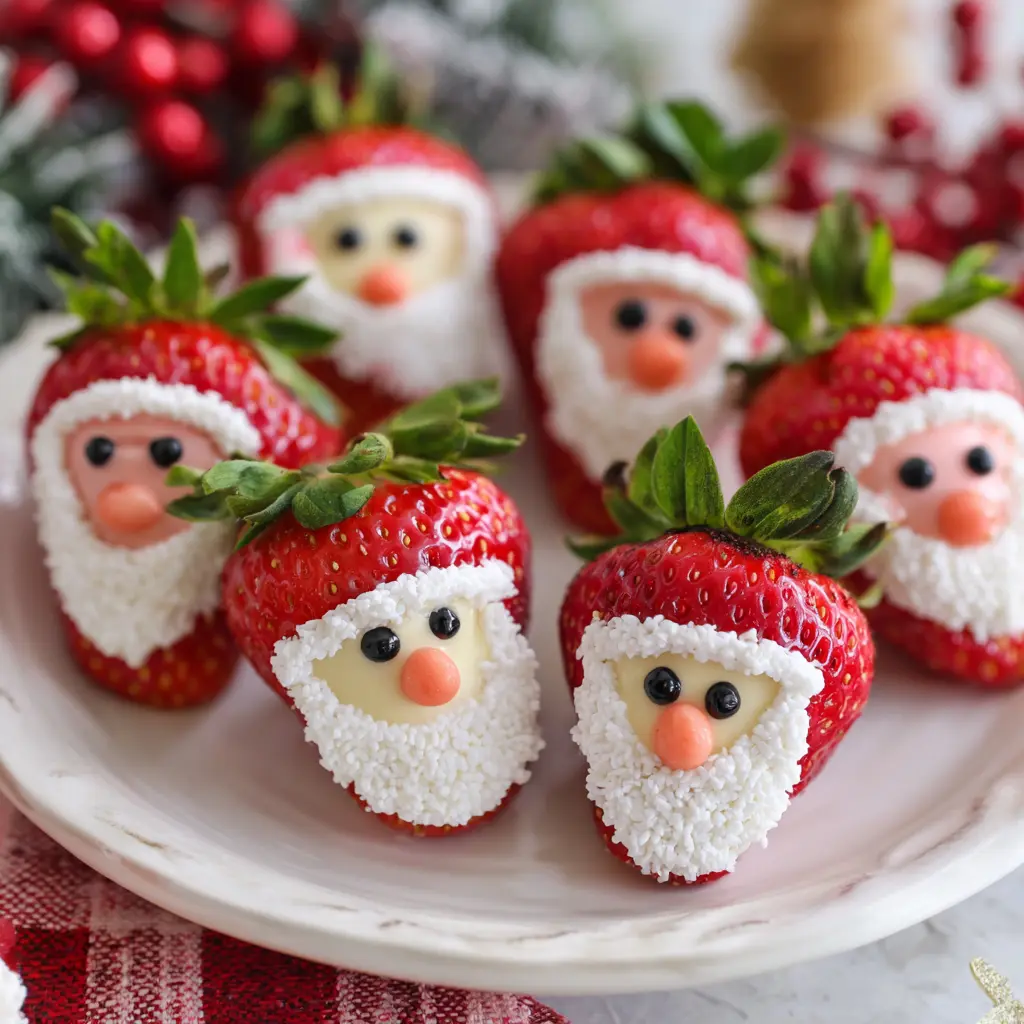
Bring festive cheer to your holiday table with these adorable Strawberry Santas! This fun, easy, and undeniably cute treat is perfect for beginners and busy parents alike. With just four simple ingredients, you can create a delightful no-bake dessert that preps in minutes. These merry little Santas are not only delicious but also a healthier, vegetarian, gluten-free, and keto-friendly option for your seasonal celebrations.
Why You’ll Love These Strawberry Santas
You’ll adore making these charming Strawberry Santas for countless reasons. They are irresistibly adorable, bringing a smile to everyone’s face, making them a centerpiece for any festive gathering. Each little Santa is also surprisingly low in calories, typically under 50, offering a guilt-free indulgence. We craft them with a homemade, less-sugar cheesecake filling, ensuring a fresh and light taste. Despite their impressive look, these treats are incredibly easy to make, perfect for involving little helpers. They’re a fantastic choice for family fun activities or elegant holiday parties. Plus, these cute creations offer a refreshing and healthier Christmas dessert alternative to traditional heavy sweets.
Ingredients
Creating delightful Strawberry Santas requires only a few fresh ingredients. Pick the best quality produce for the most vibrant flavors.
- 12 large strawberries: Select ripe, firm, and uniformly sized strawberries. These will form the body and hat of your Santa.
- 1 cup whipped cream cheese: Use full-fat for a richer taste or reduced-fat for a lighter option. This forms the creamy white beard and suit trim.
- 2 tablespoons powdered sugar: Just a touch of sweetness balances the tangy cream cheese. Adjust to your preference.
- 1/4 teaspoon vanilla extract: Pure vanilla adds a lovely aromatic depth to the filling.
- Decorative red and black icing for the face: Small tubes of gel icing work perfectly for drawing the eyes and nose.
Notes & Substitutions
High-quality, fresh strawberries are key for the best texture and appearance. Look for bright red berries without blemishes. Using whipped cream cheese ensures a smooth, light texture that is easy to pipe, saving you time. For alternative sweeteners, consider a sugar substitute like erythritol or stevia to keep these Strawberry Santas keto-friendly. Research on keto-friendly sweeteners highlights that options like erythritol and stevia can be excellent for maintaining a low-carb diet. If you don’t have vanilla extract, a tiny pinch of almond extract can offer a different, delightful flavor. Instead of icing, use mini chocolate chips or black sesame seeds for the Santa’s eyes, and a tiny piece of red candy for the nose.
Equipment
Gathering your equipment beforehand makes the assembly process smooth and quick.
- Sharp knife: Essential for precisely slicing the strawberries.
- Small mixing bowl: For preparing the creamy cheesecake filling.
- Hand mixer or whisk: To combine the filling ingredients until smooth.
- Piping bag with star tip: Creates the iconic fluffy beard and hat pom-pom.
- Cutting board: Provides a stable surface for fruit preparation.
- Serving platter: For an attractive presentation of your finished Strawberry Santas.
Instructions
Making Strawberry Santas is a simple, step-by-step process. Follow these instructions for perfect, festive results.
Prepare the Strawberries
- Gently wash all 12 large strawberries under cool running water. Handle them carefully to avoid bruising.
- Thoroughly pat each strawberry dry with a paper towel. This crucial step prevents the filling from becoming watery or sliding off.
- Slice off the green stem end of each strawberry to create a flat base. This flat surface allows your Strawberry Santas to sit steadily on a plate.
- Next, cut each berry in half crosswise, about two-thirds of the way down from the tip. You want the larger bottom piece for the Santa’s body and a smaller top piece for the hat. Ensure the “hat” piece leaves enough room for the cream cheese filling.
Prepare the Cheesecake Filling
- In a small mixing bowl, combine the whipped cream cheese, powdered sugar, and vanilla extract.
- Mix these ingredients together using a hand mixer or a whisk until the mixture becomes completely smooth and creamy. Ensure no lumps remain for easy piping.
- Carefully transfer this smooth cream cheese mixture into a piping bag fitted with a star tip. A star tip creates the most appealing, fluffy texture for the beard and pom-pom of your Strawberry Santas. Twist the top of the piping bag to secure the filling.
Assemble the Strawberry Santas
- Place the larger strawberry base piece, flat side down, onto your serving platter or individual plates. This forms the body of your Santa.
- Pipe a generous amount of cream cheese mixture onto the flat top of the strawberry base. Build up the filling high enough to create a distinct “body” that can hold the hat and allow space for the face.
- Gently place the smaller, pointed top strawberry piece on the piped cream cheese. This forms the iconic red Santa hat.
- Pipe a small, neat dollop of cream cheese mixture onto the very tip of the “hat.” This creates the classic pom-pom on Santa’s cap.
- Carefully use the black decorative icing to draw two small dots for the eyes on the cream cheese “face.”
- Finally, use the red decorative icing to draw a small round dot for the nose, completing your adorable Strawberry Santas.
Pro Tips & Troubleshooting
Mastering your Strawberry Santas is simple with a few helpful hints. For the piping bag, fill it no more than two-thirds full to prevent overflow, then twist the top securely. Always choose fresh, firm strawberries; overly ripe or soft berries won’t hold their shape. Thoroughly drying your strawberries after washing is essential; moisture makes the filling slide off, leading to soggy Santas. If your cream cheese filling feels too stiff to pipe, let it sit at room temperature for a few minutes to soften slightly, but avoid making it too warm. Keep decorating simple, especially if kids are helping, as part of the charm is their homemade look. For the best presentation, try to select similar-sized strawberries for uniformity.
Serving, Storage, & Variations
Serve your delightful Strawberry Santas immediately after assembly for the freshest taste and best appearance. If you need to prepare them slightly ahead, chill them in the refrigerator for up to an hour. For storage, keep any leftover Strawberry Santas in an airtight container in the fridge. They are best enjoyed within 1-2 days, as the strawberries can start to soften over time.
For a healthier option, you can replace some of the cream cheese filling with mashed banana slices for a naturally sweet alternative. Boost the protein by substituting half of the cream cheese with plain Greek yogurt. You can even try a cannoli-style filling by using ricotta cheese mixed with a touch of sugar and cinnamon. For a dairy-free version, simply use your favorite vegan cream cheese. Get creative with alternative faces by using mini chocolate chips or sprinkles for eyes. If you prefer a more indulgent treat, use store-bought frosting instead of the cheesecake filling. Pair these cheerful Strawberry Santas with a warm cup of hot chocolate or other festive holiday drinks for the ultimate seasonal experience.
Nutrition
These Strawberry Santas offer a lighter, fruit-focused dessert option. The nutritional information per serving provides a general guideline.
| Per Serving (1 Santa) | Amount |
|---|---|
| Calories | 49 kcal |
| Carbohydrates | 4g |
| Protein | 2g |
| Fat | 3g |
| Saturated Fat | 2g |
| Cholesterol | 11mg |
| Sodium | 72mg |
| Fiber | 0.2g |
| Sugar | 3g |
This breakdown highlights that these Strawberry Santas are a relatively low-calorie and low-sugar dessert choice, primarily due to the fresh fruit base. Furthermore, the numerous nutritional benefits of strawberries, including their rich antioxidant content, contribute to the healthfulness of this festive treat. They make a wonderfully healthy and guilt-free addition to your holiday spread.
FAQ
Can I make these Strawberry Santas ahead of time?
You can assemble them a few hours before serving. Keep them refrigerated until guests arrive to maintain freshness and prevent the cream cheese from softening too much.
How long do leftovers last?
Leftover Strawberry Santas are best enjoyed within one to two days when stored in an airtight container in the refrigerator. The strawberries will soften over time.
Can I freeze them?
Freezing is not recommended for these treats. The texture of both the strawberries and the cream cheese filling will change significantly upon thawing, becoming watery and mushy.
Can I use frozen strawberries?
No, always use fresh strawberries for this recipe. Frozen strawberries release too much water when thawed, making the Santas soggy and unstable.
What if I don’t have a piping bag?
You can easily use a strong Ziploc bag. Fill the bag with the cream cheese mixture, snip off a small corner, and pipe the filling just as you would with a regular piping bag.
Conclusion
These delightful Strawberry Santas are truly a celebration of fun, ease, and festive spirit. They offer an adorable and simple way to brighten any holiday gathering, perfect for busy parents and beginners alike. We encourage you to try making these charming treats and discover how effortlessly they come together. They stand out as a healthier, fruit-based alternative among traditional holiday desserts. Make sure to share your creations, rate the recipe, and tag us in your delicious photos! For more quick and easy festive ideas, explore our collection of healthy Christmas treats.


